- 0 commentaire
- par Minase Suiren
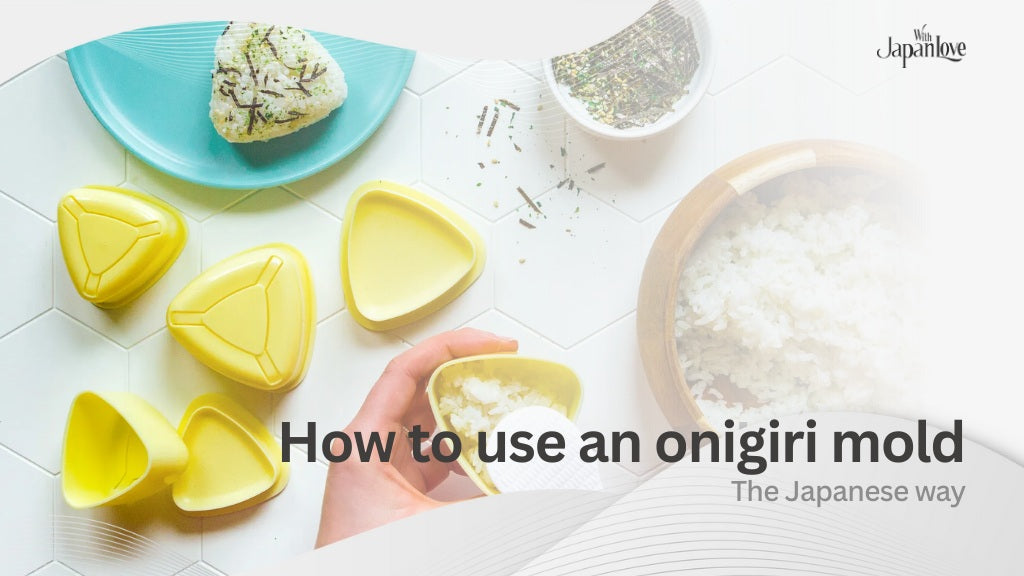
How to use onigiri mold the Japanese way?
- 0 commentaire
- par Minase Suiren
How to use onigiri mold is the easiest way to create perfectly shaped Japanese rice balls at home, even if you have never cooked Japanese food before. From traditional family kitchens in Japan to modern bento boxes around the world, onigiri molds help keep rice fluffy, uniform, and visually appealing. At Japan With Love, we believe understanding the correct Japanese method transforms onigiri from a simple snack into a cultural experience.
Onigiri molds have become increasingly popular around the world as more people discover Japanese home cooking and look for simple, practical kitchen tools. What was once a common household item in Japan is now embraced globally for its convenience, versatility, and cultural appeal. Below are the key reasons why onigiri molds are so widely loved today.

With so many options available today, choosing the right onigiri mold can feel overwhelming. The good news is that a well-chosen mold does not need to be expensive. By focusing on how you plan to use it and what matters most in your kitchen, you can easily find a mold that fits both your needs and your budget.

Once you have selected the right mold, learning how to use onigiri mold properly is the key to achieving authentic Japanese onigiri with the right shape and texture. The traditional method focuses on gentle handling and balance, allowing the rice to stay fluffy while holding together naturally. If you're just starting out, this detailed guide on onigiri mold can help you understand the basics more clearly.
Japanese onigiri are made with freshly cooked short-grain rice. The rice should be slightly warm, glossy, and sticky enough to hold its shape without becoming mushy. After cooking, gently fluff the rice and let it cool for a few minutes. Season lightly with salt if desired. In Japanese cooking, less seasoning allows the natural sweetness of the rice to stand out.

Fillings should be prepared ahead of time and cooled completely. Common choices include salted salmon, tuna mixed with mayonnaise, pickled plum, or cooked chicken. The filling should be flavorful but not watery, as excess moisture can weaken the structure of the onigiri.
Before adding rice, lightly rinse or brush the inside of the mold with water. This simple step prevents rice grains from sticking and helps the onigiri release cleanly. Many Japanese home cooks also add a pinch of salt to the water, which enhances flavor and improves preservation.
Avoid using oil, as it can affect taste and texture. Proper moisture is especially important when learning how to use onigiri mold for the first time.
Spoon rice into the mold until it is about one-third to halfway full. Spread the rice gently and evenly across the bottom. Do not press down hard. The goal is to keep air between the grains so the onigiri remains soft and light. This step forms the base of the onigiri and plays a big role in achieving an even shape.

Make a small indentation in the center of the rice and add the filling. Keep it centered and avoid overfilling. Most onigiri only need about one tablespoon of filling, depending on the mold size.
Proper placement ensures the filling stays hidden inside and does not leak out when the onigiri is released from the mold.
Add more rice on top until the mold is full. Level the surface gently. If your mold has a lid, place it on top and apply light, even pressure. The purpose is to shape the rice, not to squeeze it tightly. This step is essential for maintaining the traditional fluffy texture associated with Japanese onigiri.

Turn the mold upside down onto a plate or clean surface. Press the release button or gently tap the mold until the onigiri slides out. If the rice was properly prepared and the mold moistened, it should release smoothly with clean edges.

Handle the onigiri carefully after unmolding. If using nori, wrap it just before eating to keep it crisp.
Proper cleaning and storage are essential to keep your onigiri mold safe, odor-free, and long-lasting. Whether you use a plastic or wooden mold, good care ensures consistent results and protects the quality of your food.

Before answering common questions, it helps to remember that Japanese onigiri making values balance, gentleness, and respect for ingredients. The answers below reflect traditional practices adapted for modern kitchens.
No, pressing hard is not recommended. Japanese onigiri should be lightly shaped so the rice remains fluffy and airy. Pressing too hard removes air between the grains, resulting in a dense texture. A mold only needs gentle pressure to hold the shape while keeping the rice soft.
Perfect onigiri come from evenly cooked rice, light handling, and proper filling placement. Use water to prevent sticking, center the filling, and avoid compression. Whether using hands or a mold, the key is shaping, not squeezing, to preserve texture.
Most standard molds hold about half to three-quarters of a cup of cooked rice per onigiri. The exact amount depends on mold size and shape. It is best to follow the mold’s capacity and avoid overfilling to ensure clean release.
Japanese short-grain rice benefits from a short soaking period of about 20 to 30 minutes before cooking. This helps the grains absorb water evenly, resulting in a better texture for onigiri. After cooking, let the rice steam briefly before molding.
To keep nori crispy, wrap it around the onigiri just before eating. If packing for later, store the rice ball and seaweed separately. Many Japanese bento solutions use divided wrappers to maintain texture until mealtime.

Minase Suiren
Minase Suiren is a seasoned cultural writer and lifestyle curator focusing on Japanese beauty rituals and everyday aesthetics. She holds a master’s degree in intercultural communication from Waseda University with a research focus on beauty norms and gender identity in modern Japanese media.
![[US customers only] New at Japan With Love: PayPal Checkout and Buy Now, Pay Later Options](http://japanwithlovestore.com/cdn/shop/articles/blog.png?v=1781073423&width=1920)


![[EU Customers Only] VAT & Duties Collection Updates](http://japanwithlovestore.com/cdn/shop/articles/JWL-VAT_Duties_Collection_Updates_d19bf602-5e33-497e-9243-7ff99c414096.jpg?v=1782802067&width=1024)


Partager:
Manga dip pen guideline: 10+ top picks, tips and best choosing tips
Japanese breakfast foods 2026 breakdown: Best dishes, drinks and recipes